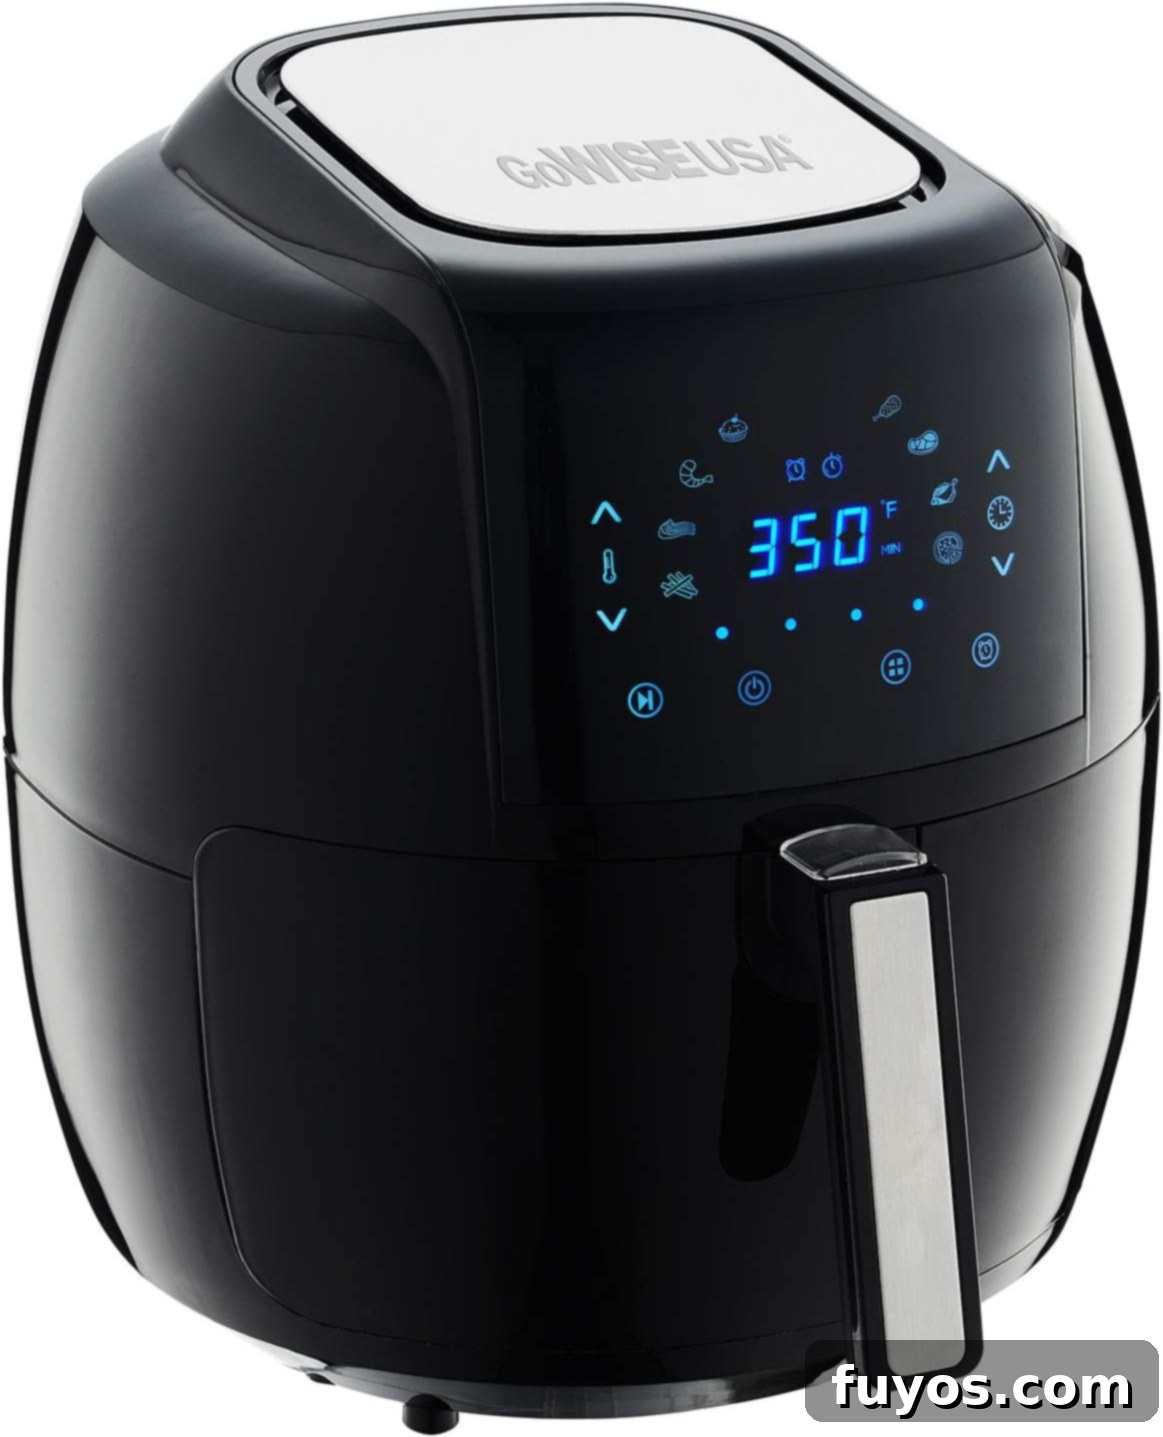
Mastering Your GoWise USA Air Fryer: A Complete Guide to Effortless Air Frying
Air fryers have revolutionized home cooking, offering a healthier and often faster alternative to traditional frying. My journey into the world of air frying began with a GoWise USA model, and it quickly became an indispensable appliance in my kitchen. However, like many new users, I initially wished I had a clearer understanding of how to use a GoWise USA air fryer effectively.
If you’re looking to bypass the manual (or perhaps yours has gone missing), this guide is specifically designed to help you confidently operate your GoWise air fryer. GoWise USA offers a range of air fryer models, from compact baskets to larger oven-style units, and even charming retro designs. Despite the variety, the core controls are intuitive and easy to master, allowing you to achieve delicious results with minimal effort. Curious about other styles? You can explore some unique options in our guide to the best retro air fryers.

Our Top Pick: Featured Air Fryer Model
GoWise USA 5.8 QT Air Fryer
Quick + Easy Recipes
straight to your inbox
How Do You Turn On a GoWise USA Air Fryer?
Getting started with your GoWise USA air fryer is a straightforward process, ensuring you’re ready to cook delicious meals in no time. Follow these simple steps to power up your appliance:
- Plug the power cord of your GoWise USA air fryer into a dedicated wall outlet. Ensure the outlet is easily accessible and capable of handling the appliance’s power requirements.
- Verify that the cooking basket is fully and securely inserted into the main unit. Most air fryers have a safety mechanism that prevents them from turning on if the basket isn’t properly locked in place.
- Some GoWise units will power on automatically once plugged in and the basket is inserted. You might see a display light up or a power indicator. If yours doesn’t immediately turn on, proceed to the next step.
- Press the power/start button. On digital models, this button typically resembles a circle with a vertical line at its topmost part (the universal power symbol). On some models, it might be a physical button; on others, it will be a digital icon on the touchscreen that you press.
Once these steps are completed, your GoWise USA air fryer should be powered on and ready for operation. This is your crucial first step towards enjoying crispy, air-fried delights.
It’s worth noting the subtle differences between models: some feature a tactile power button, while others utilize a responsive digital button on the control panel. For the less common analog GoWise air fryers, power is usually indicated by a green light on the unit’s front, which illuminates automatically upon plugging in.

How to Operate a GoWise USA Air Fryer for Cooking
Operating your GoWise USA air fryer is designed to be intuitive, whether you have a digital or analog model. Here’s a detailed breakdown of how to set your cooking parameters and start the air frying process:
- Initial Setup: Begin by ensuring the power cord is securely plugged in and the cooking basket is fully inserted into the unit. This prepares the air fryer for operation.
- Setting Temperature and Time:
- Digital Models: Use the dedicated up/down arrows on the touchscreen to adjust the temperature and time. Look for distinct icons – typically a thermometer for temperature and a clock for time – to guide your selection.
- Analog Models: Simply rotate the temperature and timer dials to your desired settings. These models offer a more traditional, hands-on approach to control.
- Starting the Cooking Cycle:
- Digital GoWise Air Fryers: After setting your desired time and temperature, press the power/start button (the same one you used to turn it on) to initiate the cooking cycle.
- Analog Models: Once you’ve set the timer, the cooking cycle usually begins automatically when you release the timer knob.
- Utilizing Smart Programs (Pre-sets): Many GoWise models come equipped with smart program buttons, often indicated by an icon such as four squares in a circle or four horizontal lines (menu button). Short press this button to cycle through various pre-set cooking options for popular dishes like fries, chicken, or fish. Once you land on your desired program, press the start button to begin.
- Setting the Kitchen Timer: If your unit includes a separate kitchen timer function, press the alarm clock icon. You can often toggle between available pre-set intervals (e.g., 5, 10, or 15 minutes) by pressing the icon repeatedly. This is useful for tracking other kitchen tasks.
Should you need to make adjustments during the cooking process, most digital models feature a pause button (often represented by two vertical lines side-by-side). Press it once to pause, make your desired changes to time or temperature, and then press the pause button again to resume cooking. This flexibility is incredibly useful for checking on food or making real-time adjustments.
Larger GoWise air fryer toaster oven models often include an internal light feature. A dedicated light button allows you to toggle this light on and off, giving you a clear view of your food’s progress without opening the door and losing heat. Simply press it once to illuminate the interior and again to turn it off.
For units equipped with a rotisserie option, a specific rotisserie button will activate this unique cooking mode. This function is separate from standard air frying and is designed exclusively for cooking foods that rotate on a spit, ensuring even browning and a delicious finish.
Katie’s tip
If the idea of rotisserie cooking in an air fryer excites you, explore our guide to the best air fryers with rotisserie to find a model that perfectly suits your culinary ambitions!
How to Turn Off Your GoWise USA Air Fryer
Turning off your GoWise USA air fryer is just as simple as turning it on. You have a couple of primary methods to power down your appliance safely:
- Long press & hold the start/power button. On digital models, holding down the power button for a few seconds will typically initiate the shutdown sequence, turning off the display and putting the unit into standby mode.
- Unplug the air fryer power cord from the wall outlet. This is the most definitive way to turn off any air fryer, completely cutting its power source. For analog models, unplugging is often the only method required to fully turn off the unit, as they may not have a dedicated power button for standby mode.
If you prefer to keep your air fryer plugged in but turned off, using the power/start button to enter standby mode is ideal. This allows for quicker startup next time you cook. Most GoWise models are also equipped with an auto shutoff feature that activates approximately 30 seconds after a cooking cycle finishes, adding an extra layer of convenience and safety.
Furthermore, a common safety design across most GoWise USA air fryer models is an automatic shutoff when the cooking basket is removed. This prevents accidental contact with heating elements and ensures the appliance pauses operation until the basket is securely reinserted.
How to Preheat a GoWise USA Air Fryer
Preheating your GoWise USA air fryer is a crucial step that significantly enhances the quality of your air-fried meals. It ensures consistent cooking and achieves that desirable crispy exterior. Here’s how to properly preheat your unit:
- Set the desired cooking temperature: Use the turn knob (for analog models) or the up and down arrows on the touch screen (for digital models) to select the temperature required for your recipe.
- Set the timer for 5 minutes: While the exact preheat time can vary based on the desired temperature and your air fryer’s size, 5 minutes is a reliable general guideline. It’s perfectly safe if the air fryer preheats for a minute or two longer than strictly necessary, and it won’t harm the appliance.
- Start the preheat cycle: For digital units, press the power/start button to begin the heating process. On analog models, the cycle commences automatically once you release the timer knob after setting the time.
- Wait for the cycle to complete: Once the 5-minute preheat cycle finishes, your GoWise USA air fryer is perfectly preheated and ready for your food. Some digital models might beep or display a “ready” message.
Though preheating adds a few minutes to your prep time, the benefits are undeniable. This step ensures that your food begins cooking instantly at the optimal temperature, rather than slowly heating up with the appliance. The result is consistently crispier textures and more evenly cooked dishes, preventing soggy spots or undercooked centers.
I highly recommend integrating preheating into your meal preparation routine. Start the preheat cycle while you’re busy with other tasks, such as cutting vegetables, seasoning your ingredients, or simply unwrapping items from their packaging. By the time your food is ready to go into the basket, your GoWise air fryer will be perfectly preheated and eager to start cooking.
Katie’s tip
Preheating is a universal best practice for most air fryers. However, if you’re exploring other brands, I also have dedicated guides to help you preheat a Pampered Chef air fryer or learn how to preheat a Ninja air fryer with ease.
Can You Put Foil in a GoWise USA Air Fryer?
Yes, you can absolutely and safely use aluminum foil in your GoWise USA air fryer. It’s a convenient tool for cooking certain foods, facilitating easier cleanup, and helping to retain moisture.
However, proper placement is key to ensure optimal air circulation. It’s best to wrap your food in foil rather than completely lining the entire cooking basket. Lining the whole basket can obstruct the crucial airflow that makes air frying effective, leading to uneven cooking and potentially longer cook times. Ensure there’s enough space around the foil for air to circulate freely.
This principle also applies if you own a larger GoWise air fryer oven. Avoid covering an entire rack insert with foil, as this will significantly restrict airflow. Instead, use foil directly on or wrapped around individual food items. For example, cooking a baked potato in the air fryer with foil works wonderfully, yielding a tender interior and a crisp skin!
Other Air Fryer How-To Guides
Final Thoughts on Using Your GoWise USA Air Fryer
With this comprehensive guide, you now have all the knowledge and confidence needed to effectively use your GoWise USA air fryer. From the initial power-on to preheating, cooking, and even safely turning it off, you’re well-equipped to embark on a journey of delicious and convenient air-fried meals.
Ready to put your new skills to the test? Don’t forget to explore our curated list of the best GoWISE air fryer recipes to discover inspiring dishes and kickstart your air frying adventures today.
Whether you own an analog, a feature-rich digital model, or a versatile air fryer toaster oven, the fundamental controls across the GoWise range are remarkably consistent. While button placements might vary slightly between models, understanding the core functions outlined here will enable you to effortlessly locate and utilize them, ensuring perfectly cooked food every single time.
